Setup Guide
Installation, Regeneration & Care
Everything you need to get your ShowerSoft up and running. Most installs take under five minutes.
Installation
No plumber needed. Most installs take under 5 minutes.
Before you start
- Hand tighten connections, then add 1/4 turn with the included wrench. Do not over tighten.
- Skip Teflon tape on first install — only add it if you see a leak.
- Make sure hoses are not kinked.
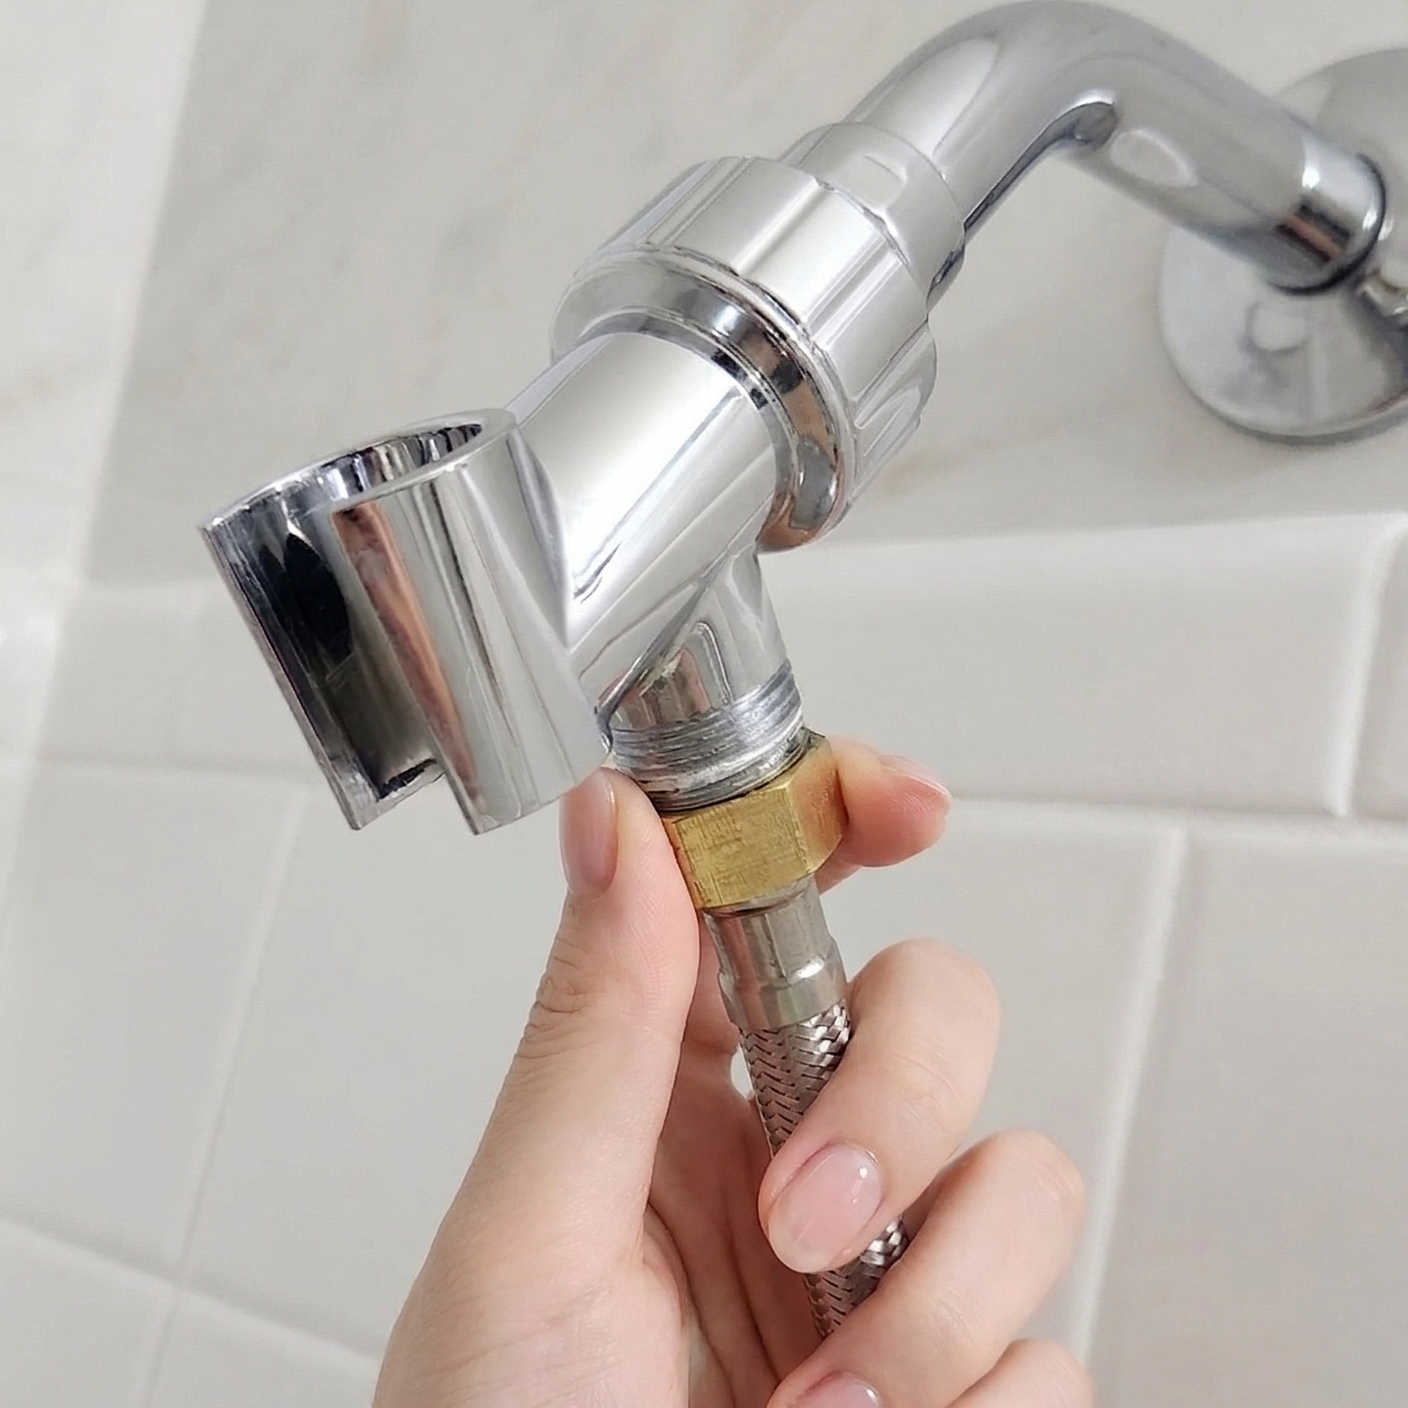
Thread the long shower hose onto your shower arm (the pipe sticking out of the wall).
Most installs take about 5 minutes.
Regeneration
Recharge your cartridge with ordinary non-iodized table salt. About 15 to 20 minutes, mostly hands-off.
Regeneration frequency depends on your water hardness and usage. Use inexpensive hardness test strips (available online, not included) to find your GPG level and set the right schedule. A family of 4 at average hardness regenerates every 2 to 3 weeks.
What you will need
- Brine tank, pump, and regeneration attachment (all included)
- 500g (about 2 cups) of non-iodized table salt
- Tap water and a sink, tub, or drain nearby

Unscrew the softener cartridge from your shower pipe and set the wall-mount attachment aside — you will not need it for regeneration. Then thread the regeneration attachment onto the cartridge the same way the wall-mount attaches. Hand-tight is fine.
Clean up before storing. Rinse the brine tank and pump with fresh water and let them air dry — salt residue left on the pump will corrode the motor over time.
Pro Tips
Know Your Hardness
Inexpensive hardness test strips are available online (not included).
Use Less Product
Soft water lathers more easily — you may need less shampoo and body wash.
Set Reminders
Regenerate every 2 to 3 weeks for optimal performance.
Troubleshooting
FAQ & Troubleshooting
Quick answers to common setup and maintenance questions.
Use inexpensive hardness test strips (available online, not included) to test your shower water. When the hardness reading rises noticeably above your post-install baseline, the resin is exhausted and needs regeneration. Most 1-2 person households regenerate every 2-3 weeks at average US hardness (10 GPG). At 20 GPG, expect roughly half that interval.
Use plain table salt (sodium chloride) without iodine or anti-caking agents if possible. Standard table salt from any grocery store works. Do not use rock salt, sea salt with large crystals, or water softener salt pellets as they dissolve too slowly.
First, make sure the hoses are not kinked. A kinked hose is the most common cause of reduced flow. Second, check that the filter element is fully seated and locked. Third, inspect the shower head for mineral buildup that may have been present before installing ShowerSoft. If flow was normal at first and decreased over time, the filter element may need regeneration.
Turn off the water, dry the connection, apply 2-3 wraps of the included Teflon tape clockwise around the threads, and retighten by hand plus a quarter turn with the included wrench. Do not over-tighten.
Yes. ShowerSoft connects between the shower arm and the shower hose. Any shower head that uses a standard 1/2 inch connection will work, including handheld and rain shower heads.
Regenerate one filter element at a time. The pump adapter fits one element. If you have two elements installed (dual setup), regenerate each one separately using the same brine solution. Refill the tank with fresh salt water between elements.
The wall surface must be clean, dry, and smooth. Wipe the area with rubbing alcohol and let it dry completely before applying. Adhesive hooks do not bond well to textured tile, painted drywall with heavy texture, or wet surfaces. Press firmly for 30 seconds and wait at least one hour before hanging the adapter.
No. After regeneration, run the shower on cold for about 5 minutes to flush remaining salt water from the cartridge and hoses. The water may taste or feel salty until flushed. Once the water tastes and feels normal, you are ready to shower.
Check that you used a full 500g of non-iodized salt and that all of it dissolved before the cycle started. If your water hardness is unusually high (above 20 GPG), you may need to regenerate more often — every 1 to 2 weeks instead of 2 to 3. Iodized salt or insufficient salt are the two most common causes of an underwhelming regeneration.
Make sure the suction cups are firmly pressed against the bottom of the tank and the hose is fully seated on both the pump and the regeneration attachment. Air leaks at the hose connections are the most common cause. Unplug, reseat both ends, press the suction cups down again, and try once more.
No. Each regeneration needs fresh salt and fresh water. The used brine contains the calcium and magnesium hardness minerals you just flushed out of the resin — running it through again would put them right back. Always start with a clean tank and a new 500g of salt.
No. The regeneration attachment is designed only for the brine cycle. For normal shower use, the wall-mount attachment is the correct fitting — it is built to handle line pressure and routes water through the cartridge in the right direction. Always swap back before reinstalling on your shower.
Still Need Help?
Our support team is here to help with installation, regeneration, or any questions about your ShowerSoft.
Email support@showersoftener.com